

In modern automotive technology, the application of on-board computers is becoming more and more extensive. From enhancing the car entertainment experience to improving the vehicle’s intelligent functions, on-board computers provide drivers and passengers with a seamless digital experience. However, the correct installation process is crucial. This article will provide you with a detailed on-board computer installation guide to help you complete the installation smoothly and ensure the efficient operation of the system.
What Is a Vehicle Computer?
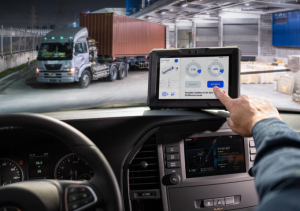
An onboard computer is an embedded computer system designed for the automotive environment. It can control and monitor various functions of the car, such as engine performance, fuel consumption, navigation system, audio system, etc. The onboard computer can also connect to the Internet to provide real-time traffic information, entertainment content and other intelligent functions.
Necessity of Installing a Vehicle Computer
In many modern cars, onboard computers have become standard. Installing an onboard computer can improve the intelligence level of the vehicle and bring the following benefits:
- Improve driving safety: By integrating sensors and real-time data feedback, the onboard computer can monitor various data of the car in real time to help drivers improve driving safety.
- Enhance the entertainment experience: Provide functions such as in-car entertainment, navigation and voice recognition to make the driving experience more comfortable and convenient.
- Intelligent control: Through the onboard computer, the driver can remotely control the vehicle and even perform vehicle diagnosis.
Preparations Before Installing the Vehicle Computer
Before you start installing a vehicle computer, you need to complete the following preparations:
- Choose the right vehicle computer: Vehicle computers of different brands and models may have different functions. You need to choose the right device based on the type of vehicle and your needs. Make sure the selected device supports your vehicle system (such as car audio, navigation system, etc.).
- Check the vehicle power supply and interface: Most vehicle computers need to be powered by the vehicle power supply, so it is very important to confirm whether the power interface is compatible with the vehicle computer.
- Prepare tools: Basic tools such as screwdrivers, wire connectors, and plastic pry bars are usually required to remove and install devices.
Installation Steps of Vehicle Computer
1. Disconnect the power supply: To ensure safety, always disconnect the vehicle’s power system before installation.
2. Choose the installation location: The vehicle computer usually needs to be installed near the center console or dashboard in the car, ensuring that the device can easily connect to other systems in the car and remain stable.
3. Remove the original device: If you are replacing an old vehicle system, you need to remove the original device first. Use appropriate tools to gently remove the console panel, making sure not to damage any parts in the car.
4. Connect the vehicle computer power and data interface: According to the device manual, connect the vehicle computer to the vehicle power and data interface. Usually, you need to connect the power cable, data transmission cable, and interfaces with vehicle audio, navigation, etc.
5. Install the display and control unit: If your vehicle computer has a touch screen or display, follow the instructions to install the display in the appropriate position and ensure that all connections are stable.
6. Debug and configure: After installation, turn on the power and debug the system. Make sure that all functions (such as audio, navigation, connecting to mobile phones, etc.) are working properly.
7. Test the system: Finally, perform a comprehensive test to check whether each function works as expected and ensure that all connections are secure and stable.
Configuration and Optimization After Installing the Vehicle Computer
After installation, you also need to configure the vehicle computer to ensure that it runs efficiently:
- Vehicle computer system update: Check for system updates regularly to ensure that you are using the latest version of the vehicle computer.
- Function configuration: Configure navigation, voice recognition, vehicle diagnostics and other functions according to personal needs to ensure that you can fully utilize the various functions of the vehicle computer.
- Data backup: To prevent data loss, you can regularly back up the files and settings of the vehicle computer.
FAQ and Troubleshooting
- The vehicle computer cannot be turned on: Check whether the power connection is correct and confirm whether the vehicle battery is charged.
- The system is sluggish: Try restarting the vehicle computer or check whether the system needs to be updated.
- The connection is unstable: Make sure the connection between the vehicle computer and other devices (such as mobile phones or Bluetooth) is stable. Repairing may help.
Conclusion
The installation of a vehicle computer can not only improve the intelligent functions of the car, but also greatly enhance the driving experience. Although the installation process may involve certain technical requirements, as long as you follow the steps, you can successfully complete the installation and enjoy the convenience brought by the vehicle computer. Before installation, be sure to choose a suitable vehicle computer and make adequate preparations to ensure that your vehicle system can run stably and intelligently.